

 Set up docs MCP
This guide provides simple and minimal settings to configure ClickHouse to use OpenSSL certificates to validate connections. For this demonstration, a self-signed Certificate Authority (CA) certificate and key are created with node certificates to make the connections with appropriate settings.
Create a ClickHouse Deployment
This guide was written using Ubuntu 20.04 and ClickHouse installed on the following hosts using the DEB package (using apt). The domain is marsnet.local:
| Host | IP Address |
|---|---|
chnode1 |
192.168.1.221 |
chnode2 |
192.168.1.222 |
chnode3 |
192.168.1.223 |
Create TLS certificates
-
Generate a key that will be used for the new CA:
openssl genrsa -out marsnet_ca.key 2048 -
Generate a new self-signed CA certificate. The following will create a new certificate that will be used to sign other certificates using the CA key:
openssl req -x509 -subj "/CN=marsnet.local CA" -nodes -key marsnet_ca.key -days 1095 -out marsnet_ca.crt
-
Verify the contents of the new CA certificate:
openssl x509 -in marsnet_ca.crt -text -
Create a certificate request (CSR) and generate a key for each node:
openssl req -newkey rsa:2048 -nodes -subj "/CN=chnode1" -addext "subjectAltName = DNS:chnode1.marsnet.local,IP:192.168.1.221" -keyout chnode1.key -out chnode1.csr openssl req -newkey rsa:2048 -nodes -subj "/CN=chnode2" -addext "subjectAltName = DNS:chnode2.marsnet.local,IP:192.168.1.222" -keyout chnode2.key -out chnode2.csr openssl req -newkey rsa:2048 -nodes -subj "/CN=chnode3" -addext "subjectAltName = DNS:chnode3.marsnet.local,IP:192.168.1.223" -keyout chnode3.key -out chnode3.csr -
Using the CSR and CA, create new certificate and key pairs:
openssl x509 -req -in chnode1.csr -out chnode1.crt -CA marsnet_ca.crt -CAkey marsnet_ca.key -days 365 -copy_extensions copy openssl x509 -req -in chnode2.csr -out chnode2.crt -CA marsnet_ca.crt -CAkey marsnet_ca.key -days 365 -copy_extensions copy openssl x509 -req -in chnode3.csr -out chnode3.crt -CA marsnet_ca.crt -CAkey marsnet_ca.key -days 365 -copy_extensions copy -
Verify the certs for subject and issuer:
openssl x509 -in chnode1.crt -text -noout -
Check that the new certificates verify against the CA cert:
openssl verify -CAfile marsnet_ca.crt chnode1.crt
chnode1.crt: OK
Create and Configure a directory to store certificates and keys.
-
Create a folder in a directory accessible by ClickHouse in each node. We recommend the default configuration directory (e.g.
/etc/clickhouse-server):mkdir /etc/clickhouse-server/certs -
Copy the CA certificate, node certificate and key corresponding to each node to the new certs directory.
-
Update owner and permissions to allow ClickHouse to read the certificates:
chown clickhouse:clickhouse -R /etc/clickhouse-server/certs
chmod 600 /etc/clickhouse-server/certs/*
chmod 755 /etc/clickhouse-server/certs
ll /etc/clickhouse-server/certs
total 20 drw-r--r-- 2 clickhouse clickhouse 4096 Apr 12 20:23 ./ drwx------ 5 clickhouse clickhouse 4096 Apr 12 20:23 ../ -rw------- 1 clickhouse clickhouse 997 Apr 12 20:22 chnode1.crt -rw------- 1 clickhouse clickhouse 1708 Apr 12 20:22 chnode1.key -rw------- 1 clickhouse clickhouse 1131 Apr 12 20:23 marsnet_ca.crt
Configure the environment with basic clusters using ClickHouse Keeper
For this deployment environment, the following ClickHouse Keeper settings are used in each node. Each server will have its own <server_id>. (For example, <server_id>1</server_id> for node chnode1, and so on.)
- Add the following inside the
<clickhouse>tag in ClickHouse serverconfig.xml
<keeper_server>
    <tcp_port_secure>9281</tcp_port_secure>
    <server_id>1</server_id>
    <log_storage_path>/var/lib/clickhouse/coordination/log</log_storage_path>
    <snapshot_storage_path>/var/lib/clickhouse/coordination/snapshots</snapshot_storage_path>

    <coordination_settings>
        <operation_timeout_ms>10000</operation_timeout_ms>
        <session_timeout_ms>30000</session_timeout_ms>
        <raft_logs_level>trace</raft_logs_level>
    </coordination_settings>

    <raft_configuration>
        <secure>true</secure>
        <server>
            <id>1</id>
            <hostname>chnode1.marsnet.local</hostname>
            <port>9444</port>
        </server>
        <server>
            <id>2</id>
            <hostname>chnode2.marsnet.local</hostname>
            <port>9444</port>
        </server>
        <server>
            <id>3</id>
            <hostname>chnode3.marsnet.local</hostname>
            <port>9444</port>
        </server>
    </raft_configuration>
</keeper_server>-
Uncomment and update the keeper settings on all nodes and set the
<secure>flag to 1:<zookeeper> <node> <host>chnode1.marsnet.local</host> <port>9281</port> <secure>1</secure> </node> <node> <host>chnode2.marsnet.local</host> <port>9281</port> <secure>1</secure> </node> <node> <host>chnode3.marsnet.local</host> <port>9281</port> <secure>1</secure> </node> </zookeeper> -
Update and add the following cluster settings to
chnode1andchnode2.chnode3will be used for the ClickHouse Keeper quorum.
The following creates a cluster with one shard replica on two servers (one on each node).
<remote_servers>
    <cluster_1S_2R>
        <shard>
            <replica>
                <host>chnode1.marsnet.local</host>
                <port>9440</port>
                <user>default</user>
                <password>ClickHouse123!</password>
                <secure>1</secure>
            </replica>
            <replica>
                <host>chnode2.marsnet.local</host>
                <port>9440</port>
                <user>default</user>
                <password>ClickHouse123!</password>
                <secure>1</secure>
            </replica>
        </shard>
    </cluster_1S_2R>
</remote_servers>-
Define macros values to be able to create a ReplicatedMergeTree table for testing. On
chnode1:<macros> <shard>1</shard> <replica>replica_1</replica> </macros>On
chnode2:<macros> <shard>1</shard> <replica>replica_2</replica> </macros>
Configure TLS interfaces on ClickHouse nodes
The settings below are configured in the ClickHouse server config.xml
-
Set the display name for the deployment (optional):
<display_name>clickhouse</display_name> -
Set ClickHouse to listen on external ports:
<listen_host>0.0.0.0</listen_host> -
Configure the
httpsport and disable thehttpport on each node:<https_port>8443</https_port> {/*<http_port>8123</http_port>*/} -
Configure the ClickHouse Native secure TCP port and disable the default non-secure port on each node:
<tcp_port_secure>9440</tcp_port_secure> {/*<tcp_port>9000</tcp_port>*/} -
Configure the
interserver httpsport and disable the default non-secure port on each node:<interserver_https_port>9010</interserver_https_port> {/*<interserver_http_port>9009</interserver_http_port>*/} -
Configure OpenSSL with certificates and paths
<openSSL>
    <server>
        <certificateFile>/etc/clickhouse-server/certs/chnode1.crt</certificateFile>
        <privateKeyFile>/etc/clickhouse-server/certs/chnode1.key</privateKeyFile>
        <verificationMode>relaxed</verificationMode>
        <caConfig>/etc/clickhouse-server/certs/marsnet_ca.crt</caConfig>
        <cacheSessions>true</cacheSessions>
        <disableProtocols>sslv2,sslv3</disableProtocols>
        <preferServerCiphers>true</preferServerCiphers>
    </server>
    <client>
        <loadDefaultCAFile>false</loadDefaultCAFile>
        <caConfig>/etc/clickhouse-server/certs/marsnet_ca.crt</caConfig>
        <cacheSessions>true</cacheSessions>
        <disableProtocols>sslv2,sslv3</disableProtocols>
        <preferServerCiphers>true</preferServerCiphers>
        <verificationMode>relaxed</verificationMode>
        <invalidCertificateHandler>
            <name>RejectCertificateHandler</name>
        </invalidCertificateHandler>
    </client>
</openSSL>
For more information, visit this page
-
Configure TLS for gRPC on every node:
<grpc>
    <enable_ssl>1</enable_ssl>
    <ssl_cert_file>/etc/clickhouse-server/certs/chnode1.crt</ssl_cert_file>
    <ssl_key_file>/etc/clickhouse-server/certs/chnode1.key</ssl_key_file>
    <ssl_require_client_auth>true</ssl_require_client_auth>
    <ssl_ca_cert_file>/etc/clickhouse-server/certs/marsnet_ca.crt</ssl_ca_cert_file>
    <transport_compression_type>none</transport_compression_type>
    <transport_compression_level>0</transport_compression_level>
    <max_send_message_size>-1</max_send_message_size>
    <max_receive_message_size>-1</max_receive_message_size>
    <verbose_logs>false</verbose_logs>
</grpc>
For more information, visit https://clickhouse.com/docs/interfaces/grpc/
-
Configure ClickHouse client on at least one of the nodes to use TLS for connections in its own
config.xmlfile (by default in/etc/clickhouse-client/):<openSSL> <client> <loadDefaultCAFile>false</loadDefaultCAFile> <caConfig>/etc/clickhouse-server/certs/marsnet_ca.crt</caConfig> <cacheSessions>true</cacheSessions> <disableProtocols>sslv2,sslv3</disableProtocols> <preferServerCiphers>true</preferServerCiphers> <invalidCertificateHandler> <name>RejectCertificateHandler</name> </invalidCertificateHandler> </client> </openSSL> -
Disable default emulation ports for MySQL and PostgreSQL:
{/*mysql_port>9004</mysql_port*/}
{/*postgresql_port>9005</postgresql_port*/}
Testing
-
Start all nodes, one at a time:
service clickhouse-server start -
Verify secure ports are up and listening, should look similar to this example on each node:
root@chnode1:/etc/clickhouse-server# netstat -ano | grep tcptcp 0 0 0.0.0.0:9010 0.0.0.0:* LISTEN off (0.00/0/0) tcp 0 0 127.0.0.53:53 0.0.0.0:* LISTEN off (0.00/0/0) tcp 0 0 0.0.0.0:22 0.0.0.0:* LISTEN off (0.00/0/0) tcp 0 0 0.0.0.0:8443 0.0.0.0:* LISTEN off (0.00/0/0) tcp 0 0 0.0.0.0:9440 0.0.0.0:* LISTEN off (0.00/0/0) tcp 0 0 0.0.0.0:9281 0.0.0.0:* LISTEN off (0.00/0/0) tcp 0 0 192.168.1.221:33046 192.168.1.222:9444 ESTABLISHED off (0.00/0/0) tcp 0 0 192.168.1.221:42730 192.168.1.223:9444 ESTABLISHED off (0.00/0/0) tcp 0 0 192.168.1.221:51952 192.168.1.222:9281 ESTABLISHED off (0.00/0/0) tcp 0 0 192.168.1.221:22 192.168.1.210:49801 ESTABLISHED keepalive (6618.05/0/0) tcp 0 64 192.168.1.221:22 192.168.1.210:59195 ESTABLISHED on (0.24/0/0) tcp6 0 0 :::22 :::* LISTEN off (0.00/0/0) tcp6 0 0 :::9444 :::* LISTEN off (0.00/0/0) tcp6 0 0 192.168.1.221:9444 192.168.1.222:59046 ESTABLISHED off (0.00/0/0) tcp6 0 0 192.168.1.221:9444 192.168.1.223:41976 ESTABLISHED off (0.00/0/0)ClickHouse Port Description 8443 https interface 9010 interserver https port 9281 ClickHouse Keeper secure port 9440 secure Native TCP protocol 9444 ClickHouse Keeper Raft port -
Verify ClickHouse Keeper health The typical 4 letter word (4lW) commands won’t work using
echowithout TLS, here is how to use the commands withopenssl.- Start an interactive session with
openssl
- Start an interactive session with
openssl s_client -connect chnode1.marsnet.local:9281CONNECTED(00000003)
depth=0 CN = chnode1
verify error:num=20:unable to get local issuer certificate
verify return:1
depth=0 CN = chnode1
verify error:num=21:unable to verify the first certificate
verify return:1
---
Certificate chain
0 s:CN = chnode1
i:CN = marsnet.local CA
---
Server certificate
-----BEGIN CERTIFICATE-----
MIICtDCCAZwCFD321grxU3G5pf6hjitf2u7vkusYMA0GCSqGSIb3DQEBCwUAMBsx
...-
Send the 4LW commands in the OpenSSL session
mntr--- Post-Handshake New Session Ticket arrived: SSL-Session: Protocol : TLSv1.3 ... read R BLOCK zk_version v22.7.3.5-stable-e140b8b5f3a5b660b6b576747063fd040f583cf3 zk_avg_latency 0 zk_max_latency 4087 zk_min_latency 0 zk_packets_received 4565774 zk_packets_sent 4565773 zk_num_alive_connections 2 zk_outstanding_requests 0 zk_server_state leader zk_znode_count 1087 zk_watch_count 26 zk_ephemerals_count 12 zk_approximate_data_size 426062 zk_key_arena_size 258048 zk_latest_snapshot_size 0 zk_open_file_descriptor_count 187 zk_max_file_descriptor_count 18446744073709551615 zk_followers 2 zk_synced_followers 1 closed
-
Start the ClickHouse client using
--secureflag and TLS port:root@chnode1:/etc/clickhouse-server# clickhouse-client --user default --password ClickHouse123! --port 9440 --secure --host chnode1.marsnet.local ClickHouse client version 22.3.3.44 (official build). Connecting to chnode1.marsnet.local:9440 as user default. Connected to ClickHouse server version 22.3.3 revision 54455. clickhouse :) -
Log into the Play UI using the
httpsinterface athttps://chnode1.marsnet.local:8443/play.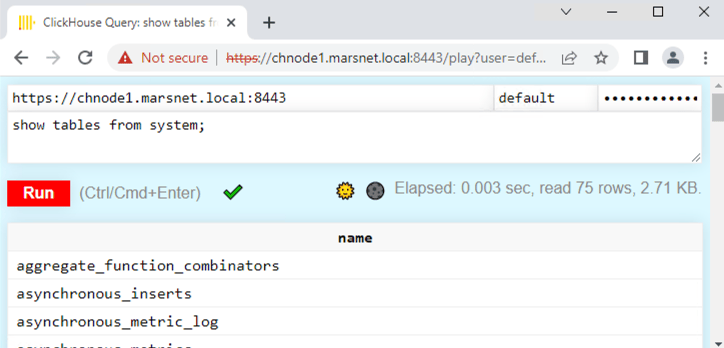
-
Create a replicated table:
clickhouse :) CREATE TABLE repl_table ON CLUSTER cluster_1S_2R
            (
                id UInt64,
                column1 Date,
                column2 String
            )
            ENGINE = ReplicatedMergeTree('/clickhouse/tables/{shard}/default/repl_table', '{replica}' )
            ORDER BY (id);
┌─host──────────────────┬─port─┬─status─┬─error─┬─num_hosts_remaining─┬─num_hosts_active─┐ │ chnode2.marsnet.local │ 9440 │ 0 │ │ 1 │ 0 │ │ chnode1.marsnet.local │ 9440 │ 0 │ │ 0 │ 0 │ └───────────────────────┴──────┴────────┴───────┴─────────────────────┴──────────────────┘ -
Add a couple rows on
chnode1:INSERT INTO repl_table (id, column1, column2) VALUES (1,'2022-04-01','abc'), (2,'2022-04-02','def'); -
Verify the replication by viewing the rows on
chnode2:SELECT * FROM repl_table┌─id─┬────column1─┬─column2─┐ │ 1 │ 2022-04-01 │ abc │ │ 2 │ 2022-04-02 │ def │ └────┴────────────┴─────────┘
Configure OpenSSL for standalone ClickHouse Keeper
When running ClickHouse Keeper as a standalone process (rather than embedded within ClickHouse server), the OpenSSL certificates and settings must be configured separately in the Keeper configuration file. Without this, Keeper will not be able to establish secure connections for client communication (tcp_port_secure) or Raft replication between Keeper nodes.
Add the following <openSSL> section to the standalone ClickHouse Keeper configuration file on each node:
<openSSL>
    <server>
        <certificateFile>/etc/clickhouse-keeper/certs/chnode1.crt</certificateFile>
        <privateKeyFile>/etc/clickhouse-keeper/certs/chnode1.key</privateKeyFile>
        <verificationMode>relaxed</verificationMode>
        <caConfig>/etc/clickhouse-keeper/certs/marsnet_ca.crt</caConfig>
        <cacheSessions>true</cacheSessions>
        <disableProtocols>sslv2,sslv3</disableProtocols>
        <preferServerCiphers>true</preferServerCiphers>
    </server>
    <client>
        <loadDefaultCAFile>false</loadDefaultCAFile>
        <caConfig>/etc/clickhouse-keeper/certs/marsnet_ca.crt</caConfig>
        <cacheSessions>true</cacheSessions>
        <disableProtocols>sslv2,sslv3</disableProtocols>
        <preferServerCiphers>true</preferServerCiphers>
        <verificationMode>relaxed</verificationMode>
        <invalidCertificateHandler>
            <name>RejectCertificateHandler</name>
        </invalidCertificateHandler>
    </client>
</openSSL>
The <server> section is used for incoming client connections on the secure Keeper port (tcp_port_secure). The <client> section is used for outgoing connections between Keeper nodes during Raft replication.
OpenSSL verification modes and certificate handlers
The <openSSL> configuration supports several options for <verificationMode> and <invalidCertificateHandler> that control how ClickHouse validates TLS certificates. These settings apply to clickhouse-server, clickhouse-client, and standalone ClickHouse Keeper.
Verification modes
Set <verificationMode> inside the <server> or <client> section of <openSSL>:
| Mode | Description |
|---|---|
none |
No certificate verification. The connection is encrypted but the peer’s identity is not checked. Only use this for testing. |
relaxed |
Verifies the peer certificate if one is presented, but does not fail if no certificate is provided. |
once |
On the server side, verifies the client certificate on the initial handshake only and skips renegotiation. On the client side, behaves the same as relaxed. |
strict |
Requires and fully verifies the peer certificate. The connection fails if the certificate is missing, expired, or not signed by a trusted CA. Recommended for production. |
Invalid certificate handlers
Set <invalidCertificateHandler> inside the <server> or <client> section of <openSSL>. This handler determines what happens when certificate verification fails. On the server side, it controls the response to invalid client certificates. On the client side, it controls the response to invalid server certificates.
| Handler | Description |
|---|---|
RejectCertificateHandler |
Rejects the connection if the certificate is invalid. This is the default and recommended setting. |
AcceptCertificateHandler |
Accepts the connection even if the certificate is invalid. Only use this for testing. |
Example: disabling certificate verification
To skip certificate verification entirely (for example, when using self-signed certificates in a test environment), set verificationMode to none and use AcceptCertificateHandler.
For clickhouse-client, you can also use the --accept-invalid-certificate CLI flag, which applies both settings automatically.
clickhouse-client (/etc/clickhouse-client/config.xml):
<openSSL>
    <client>
        <loadDefaultCAFile>false</loadDefaultCAFile>
        <cacheSessions>true</cacheSessions>
        <disableProtocols>sslv2,sslv3</disableProtocols>
        <preferServerCiphers>true</preferServerCiphers>
        <verificationMode>none</verificationMode>
        <invalidCertificateHandler>
            <name>AcceptCertificateHandler</name>
        </invalidCertificateHandler>
    </client>
</openSSL>
clickhouse-server (config.xml or a file in config.d/). The <server> section still requires certificate and key paths because the server must present its own certificate to clients, even when it isn’t verifying theirs:
<openSSL>
    <server>
        <certificateFile>/etc/clickhouse-server/certs/server.crt</certificateFile>
        <privateKeyFile>/etc/clickhouse-server/certs/server.key</privateKeyFile>
        <verificationMode>none</verificationMode>
        <caConfig>/etc/clickhouse-server/certs/ca.crt</caConfig>
        <cacheSessions>true</cacheSessions>
        <disableProtocols>sslv2,sslv3</disableProtocols>
        <preferServerCiphers>true</preferServerCiphers>
    </server>
    <client>
        <loadDefaultCAFile>false</loadDefaultCAFile>
        <cacheSessions>true</cacheSessions>
        <disableProtocols>sslv2,sslv3</disableProtocols>
        <preferServerCiphers>true</preferServerCiphers>
        <verificationMode>none</verificationMode>
        <invalidCertificateHandler>
            <name>AcceptCertificateHandler</name>
        </invalidCertificateHandler>
    </client>
</openSSL>
Standalone ClickHouse Keeper (Keeper configuration file):
<openSSL>
    <server>
        <certificateFile>/etc/clickhouse-keeper/certs/keeper.crt</certificateFile>
        <privateKeyFile>/etc/clickhouse-keeper/certs/keeper.key</privateKeyFile>
        <verificationMode>none</verificationMode>
        <caConfig>/etc/clickhouse-keeper/certs/ca.crt</caConfig>
        <cacheSessions>true</cacheSessions>
        <disableProtocols>sslv2,sslv3</disableProtocols>
        <preferServerCiphers>true</preferServerCiphers>
    </server>
    <client>
        <loadDefaultCAFile>false</loadDefaultCAFile>
        <cacheSessions>true</cacheSessions>
        <disableProtocols>sslv2,sslv3</disableProtocols>
        <preferServerCiphers>true</preferServerCiphers>
        <verificationMode>none</verificationMode>
        <invalidCertificateHandler>
            <name>AcceptCertificateHandler</name>
        </invalidCertificateHandler>
    </client>
</openSSL>
Rotating certificates and CA certificates without a restart
ClickHouse server and ClickHouse Keeper watch the files referenced by certificateFile, privateKeyFile and caConfig
in the openSSL.server and openSSL.client sections (and in protocols.* for composable protocols), or the files in the
directory if caConfig is a directory. When one of these files changes, or when SYSTEM RELOAD CONFIG is executed, the
certificates are reloaded and used for all new TLS connections, including HTTPS, the secure native protocol, interserver
connections, connections to Keeper and the Raft connections between Keeper nodes. Established connections keep using the
certificates they were opened with.
To rotate a CA without downtime, first replace the caConfig file with a bundle that contains both the old and the new
CA certificate, then switch the node and client certificates to ones issued by the new CA, and finally replace the bundle
with the new CA certificate only.
Summary
This article focused on getting a ClickHouse environment configured with TLS. The settings will differ for different requirements in production environments; for example, certificate verification levels, protocols, ciphers, etc. But you should now have a good understanding of the steps involved in configuring and implementing secure connections.